

Introduction
It’s a busy day, you are tired and running 30 minutes behind in rooms when a dog is rushed to the back in cardiopulmonary arrest (CPA). You need to immediately shift your body and brain from practicing general medicine to practicing emergency medicine. Do you and your team know how to perform cardiopulmonary resuscitation (CPR)? Save this article, it could help save a life!
This may sound obvious, but the essential first step is recognizing CPA: recognizing that the patient is in fact in CPA and does require CPR.
CPR encompasses basic life support (BLS) and advanced life support (ALS), with the ultimate goals being return of spontaneous circulation (ROSC), survival to discharge, and favorable neurological outcomes.
BLS is defined as the part of the CPA response that is immediate. It includes CPA recognition, chest compressions, airway management, and ventilation. BLS can be performed in a clinical setting or by trained individuals in a non-clinical setting.
ALS is defined as the part of the CPA response that includes monitoring (e.g. electrocardiography (ECG) and capnography), vascular access, emergency drugs, and electrical defibrillation when indicated. ALS can only be performed in a clinical setting.
This VetpocketTM article focuses specifically on BLS, and pertains to closed-chest CPR. The recommendations within this article are based on the 2024 RECOVER guidelines.
BLS Quick Summary
Rescuer 1 – Chest Compressions:
- Immediately initiate
- Lateral recumbency: 1/3 to 1/2 chest width
- Dorsal recumbency: 1/4 chest depth
- Allow chest wall to fully recoil
- Rate: 100 to 120 consecutive high-quality chest compressions per minute
- Cycle: uninterrupted 2-minute cycles
- Change chest compressors as quickly as possible to minimize interruptions; interruptions between chest compression cycles should be < 10 seconds
Rescuer 2 – Airway and Ventilation:
- ASAP, ideally simultaneously with chest compression initiation
- Ensure patent airway
- Intubate if possible
- Ventilation rate: 10 breaths per minute (1 breath every 6 seconds)
- Short inspiratory time: ~1 second
- Tidal volume: ~10 mL/kg
Non-intubated patients or single-rescuer CPR:
- Immediately perform airway assessment
- Followed immediately by chest compressions thereafter
- Compression-to-ventilation ratio (C:V) is 30:2
BLS Order: “ABC” or “CAB”?
The recommended order in which to perform BLS used to be “Airway, Breathing, Circulation” (“ABC”), but current recommendations prioritize the order “Circulation, Airway, Breathing” (“CAB”). However, given that primary respiratory arrest is more common in dogs and cats compared to humans, early airway management and ventilation are still strongly recommended.
With multi-rescuer CPR, it is recommended to immediately initiate chest compressions, and as soon as possible (ideally simultaneously) perform airway assessment, endotracheal intubation, and ventilation.
With single-rescuer CPR, it is recommended to immediately perform airway assessment, followed immediately by chest compressions thereafter.
Circulation: The “C” in “CAB”
Immediately initiate high-quality chest compressions, as these are vital for helping achieve positive CPR outcomes.
Chest compressions restore blood flow, delivering oxygen to tissues and to the pulmonary circulation (facilitating gas exchange in the lungs: oxygen uptake and carbon dioxide elimination). Achieving high-quality chest compressions requires attention to depth, rate, and cycle duration.
Recommendation for patient positioning (ex. lateral vs dorsal recumbency) and specific chest compression location (ex. directly over the heart vs over the widest portion of the thorax) will vary based on patient size and body conformation.
Chest Compressions – Chest Compressor Positioning
In medium to large breed dogs, the chest compressor needs to stand or kneel behind the patient.
The chest compressor should then extend their elbows, flex their wrists and place one hand on top of the other hand with their fingers interlaced or held together, and the heels of their hands overlapping.
The heels of their hands should be placed over the appropriate compression point (see below).
It is important to keep the chest compressor’s shoulder position directly over the chest compressor’s wrist position with elbows remaining locked, during both compression and decompression.
Chest Compressions – Patient Positioning and Compression Point
It is important to note that the location of chest compressions differ based on patient size and chest conformation.
Dogs in lateral recumbency, with chest compressions performed directly over the heart, are more likely to result in direct compression of the heart. This is referred to as the cardiac pump theory.
Dogs in lateral recumbency, with chest compressions performed over the widest portion of the thorax, are more likely to result in increased overall intrathoracic pressure. This is referred to as the thoracic pump theory.
In medium to large breed, round-chested dogs (e.g. Golden Retriever, Labrador Retriever, and Pit Bull), it is recommended to perform chest compressions in lateral recumbency, with the chest compressor placing their hands over the widest portion of the thorax. See Figure 1.
In medium to large breed, deep-chested or keel-chested dogs (e.g. Doberman Pinscher, German Shepherd, and Greyhound), it is recommended to perform chest compressions in lateral recumbency, with the chest compressor placing their hands directly over the heart. See Figure 2.
In non-wide-chested dogs, it is recommended to perform chest compression in lateral recumbency.
In wide-chested dogs (e.g. Bulldog), it is recommended to initially perform chest compressions in lateral recumbency, with the chest compressor placing their hands over the widest portion of the thorax until an endotracheal tube can be placed. Once an endotracheal tube has been placed, and during an inter-cycle pause, it is recommended to then switch to chest compressions in dorsal recumbency, with the chest compressor placing their hands over the sternum directly over the heart. See Figure 3.
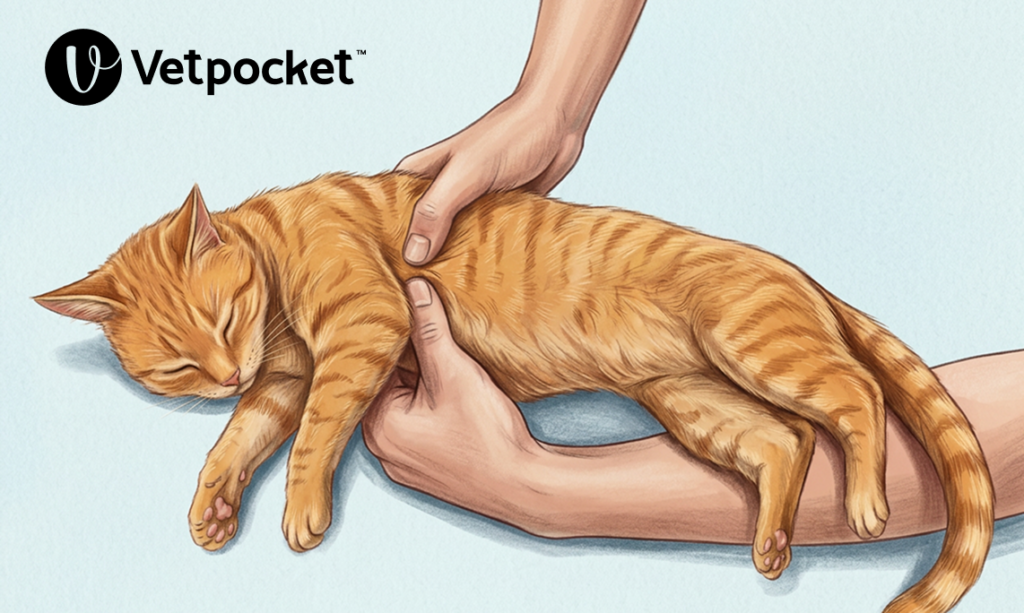
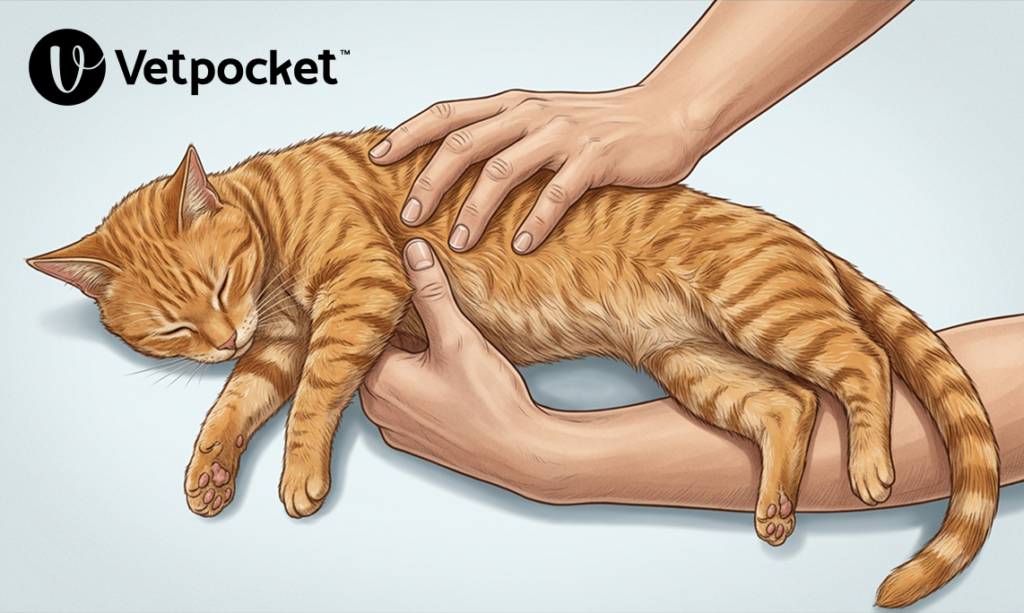
In small dogs and cats, there are three recommended techniques to choose from:
- (i) 2-finger or circumferential 2-thumb chest compression technique. Chest compressions in lateral recumbency, with the chest compressor placing both thumbs directly over the heart. See Figure 4.
- (ii) 1-handed thumb-to-fingers technique. Chest compressions performed with dominant hand wrapped around the sternum at the level of the heart, with the chest compressor performing compressions between the flat portion of the fingers and the flat portion of the thumb. See Figure 5.
- (iii) 1-handed palm technique. Chest compressions in lateral recumbency, with the chest compressor placing the heel of the dominant hand over the level of the heart and compressing 1/3 to 1/2 of the chest width, with the non dominant hand supporting the dorsal thorax. See Figure 6.


Chest Compressions – Depth
In lateral recumbency, compress the chest by 1/3 to 1/2 of the thoracic width.
In dorsal recumbency, compress the chest by 1/4 of the thoracic depth.
Chest Compressions – Recoil
Allow the chest wall to fully recoil (expand) after each chest compression to help maximize venous return.
If the chest wall is not allowed to fully recoil after each chest compression, it may result in an increased intrathoracic pressure, and therefore in decreased venous return.
Chest Compressions – Rate
It is recommended to maintain a chest compression rate of 100 to 120 consecutive chest compressions per minute.
Songs that have a tempo that provide this chest compression rate include “Stayin’ Alive” by the Bee Gees and “Golden” by Huntrix.
Chest Compressions – Cycle Duration
Any pause in chest compressions causes cessation of blood flow to vital organs. This is why it is crucial to not only immediately initiate chest compressions, but also to minimize pauses. Data indicates that high-quality chest compressions need to be delivered for 1 minute prior to reaching maximal arterial pressure during CPR.
Each chest compression cycle should be an uninterrupted 2-minute cycle of continuous high-quality chest compressions.
The goal with the brief pause every 2 minutes (between each 2-minute cycle) is to assess the ECG, as well as to switch chest compressors in order to help minimize rescuer fatigue (switching chest compressors helps avoid rescuer fatigue).
A new chest compressor should be ready for each 2-minute cycle.
Chest compressor changes should be done as quickly as possible to help minimize interruptions.
Minimize pauses: interruptions between chest compression cycles should be < 10 seconds.
If a chest compressor is becoming fatigued during a 2-minute cycle, since high-quality chest compressions are crucial to a favorable outcome, a rapid (< 1 second) switch mid-cycle is acceptable.
If ROSC is strongly suspected during a 2-minute cycle, it is acceptable to pause chest compressions mid-cycle to determine if that is the case, or to complete the 2-minute cycle and assess for ROSC at the scheduled pause.
Airway: The “A” in “CAB”
Ensure a patent airway simultaneously with chest compression initiation.
If in a clinical setting, and if possible, intubate the patient while in lateral recumbency and provide 100% oxygen.
If endotracheal intubation is not possible (i.e. in non-intubated patients), it is recommended to perform rescue breaths using a tight-fitting facemask with oxygen supplementation.
In non-intubated patients, if a tight-fitting facemask is not available, and if there is no risk of zoonotic disease nor of narcotics exposure, then it is recommended to perform rescue breaths using the mouth-to-nose ventilation technique.
In non-intubated patients, if a tight-fitting mask is not available, and if there is a zoonotic disease or narcotics exposure risk, then it is recommended to perform chest-compression-only CPR.
Breathing: The “B” in “CAB”
Ventilation and rescue breaths are essential for oxygenation and optimizing PaCO2.
Ventilation allows for gas exchange at the level of the alveolus, providing oxygenation of arterial blood and removing carbon dioxide from venous blood.
The recommended ventilation rate is 10 breaths per minute (1 breath every 6 seconds), with a short inspiratory time of ~1 second, and a tidal volume of ~10 mL/kg.
Peak Inspiratory Pressure
It is recommended to monitor peak inspiratory pressure (PIP) to help ensure adequate chest rise.
Excessive airway pressure can be harmful.
The maximum recommended PIP is 40 cm H2O. Note that a higher PIP may be necessary for patients with lung disease that significantly limits pulmonary compliance.
Mechanical Ventilation
If the patient is on a mechanical ventilator, it is recommended to switch to manual ventilation.
If mechanical ventilation must be used, the recommended settings are volume-controlled ventilation mode, 10 mL/kg tidal volume, 10 breaths per minute ventilation rate, 0 cm H2O positive end-expiratory pressure (PEEP), 40 cm H2O pressure limit, and a trigger sensitivity least likely to detect a breath (e.g. ~10 cm H2O).
Non-Intubated Patients or Single-Rescuer CPR
In non-intubated patients or with single-rescuer CPR, chest compressions must be paused to deliver ventilation.
The recommended compression-to-ventilation ratio (C:V) is 30:2 (30 chest compressions:2 breaths). This ratio means that the rescuer must provide 30 consecutive chest compressions followed by 2 breaths, then repeating this cycle.
Recognizing ROSC
Suspect ROSC when there is (i) a sudden, large, and persistent increase in ETCO2 (e.g., an increase of >= 10 mm Hg, reaching >= 35 mm Hg), and (ii) an arterial pulse distinct from chest compressions.
If a capnograph is unavailable, it is recommended to not interrupt a 2-minute cycle based solely on suspected ROSC.
Stay tuned for “Part 2: Advanced Life Support (ALS)”.
References
- Kate Hopper BVSc, PhD, DACVECC, Steven E. Epstein DVM, DACVECC, Jamie M. Burkitt-Creedon DVM, DACVECC, Daniel J. Fletcher PhD, DVM, DACVECC, Manuel Boller Dr med vet, MTR, DACVECC, Erik D. Fausak MSLIS, RVT, Kim Mears MLIS, AHIP, Molly Crews MLS, the RECOVER Basic Life Support Domain Evidence Evaluators. 2024 RECOVER Guidelines: Basic Life Support. Evidence and knowledge gap analysis with treatment recommendations for small animal CPR. June 26, 2024. Accessed February 26, 2026.